ReCycle Operation Manual
DAW
|
Rack Plugin
|
Reason+ Rack Extensions
The ReCycle Window
#
Window Overview
#
Window Title
The window title at the top to the left displays two things:
•
The name of the file.
•
An asterisk which indicates if the file hasn’t been saved yet (Windows OS only).
#
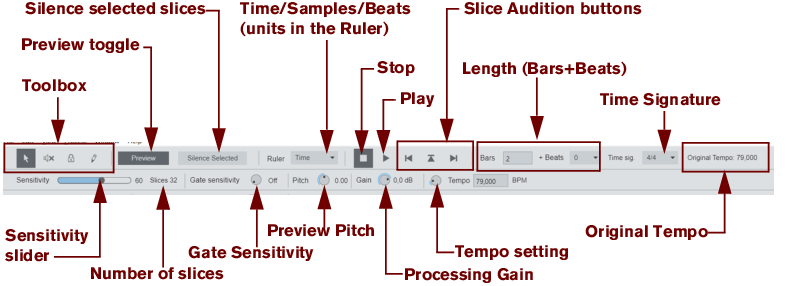
Toolbar Section
The Toolbar contains the following items:
•
About the Time/Samples/Beats selector
With the Time/Samples/Beats selector you can choose what units should be displayed in the Waveform Display ruler. If “Beats” is selected there will also be vertical “grid” lines throughout the Waveform Display.
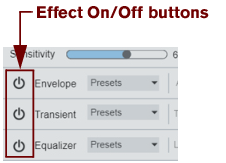
The lower left area of the Toolbar contains the Effect On/Off buttons:
#
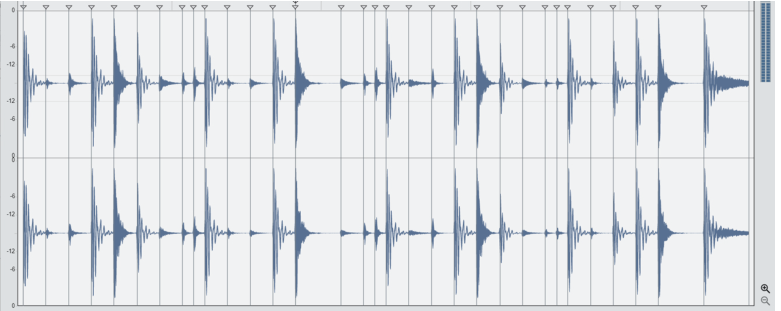
Waveform Display
#
Toolbox
The Toolbox is located in the upper left corner of the toolbar. You select a tool from the Toolbox by clicking on its icon. Below follows a brief description of what the tools do. Detailed applications follow later in this chapter and in the following chapters.
|
Tool
|
Description
Arrow
Used for selecting Slice markers by clicking on their handles.
Mute
Used for muting slices by clicking on their handles.
Lock
Used for locking slices, by clicking on their handles.
Pencil
Used for adding slices manually.
#
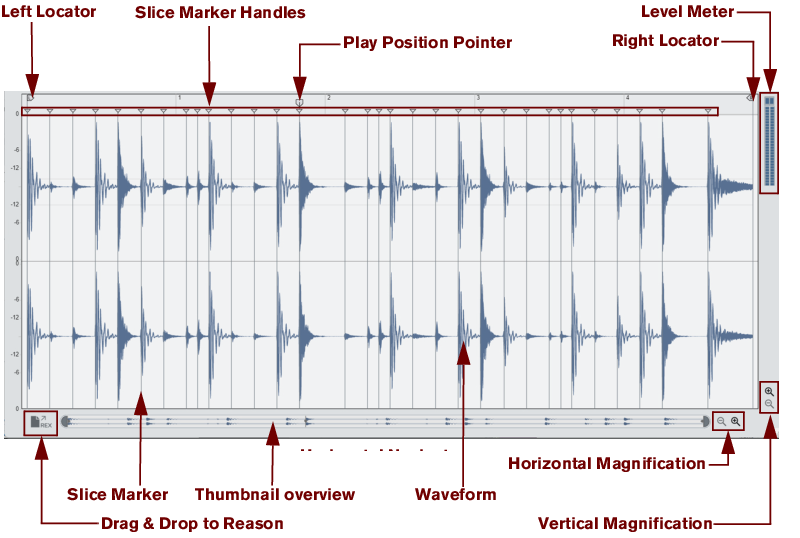
Level Meter
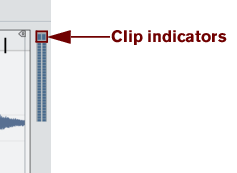
The level meter indicates the output level of the selected file during playback. Two meter bars are shown for stereo files and one bar for mono files.
You should check that levels never cause the Clip indicator(s) at the top of the meter to light up.
•
If Preview mode is selected, the meters indicate the level, post any applied effects.
•
You can boost or cut the level with the “Gain” parameter in Preview mode.
In case of boosting the output level, watch the meter (and listen) carefully to avoid clipping.
#
Window Handling
You can open as many loops as RAM permits, and they will each appear in a window.
•
For more information about window handling, see the documentation that came with your computer.
•
ReCycle’s Windows menu contains a list of the currently open windows. Selecting one makes it active.
•
The Close item on the File menu closes the active window.
#
Scrolling and Zooming
#
Scrolling horizontally
To scroll with the Navigator, click anywhere inside the frame in the Navigator and drag the frame to the desired position.
As the pointer enters the frame, it automatically switches to a hand symbol.
Alternatively, click anywhere in the Navigator area to immediately jump to the desired position.
#
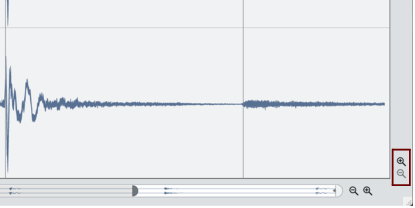
Zooming horizontally
You can zoom in and out horizontally in the Waveform Display by clicking the + and - Magnifier buttons - or by using the Navigator.
To zoom in horizontally, click on the “+” button to the right of the Navigator.
To zoom out horizontally, click on the “-” button to the right of the Navigator.
To zoom in and out horizontally, click and drag a Navigator handle sideways.
The pointer changes to a double arrow symbol and you can now zoom in by resizing the Navigator frame.
[Shift]-click on a Navigator handle and drag horizontally to zoom in and out symmetrically.
By [Shift]-clicking or right-clicking inside the Navigator frame you can both scroll (drag sideways) and zoom (drag up or down) simultaneously.
#
Zooming horizontally using the Magnifying Glass
The Zoom in and zoom out tools.
#
Zooming in
1.
Hold down [Command](Mac) or [Ctrl](Win).
2.
Move the mouse over the waveform area.
The pointer turns into a magnifying glass.
Click once in the waveform.
The view is zoomed in one step. The position you clicked at will be centered in the window.
#
Zooming out
Zooming out is done the same way as zooming in, except you also hold down the [Option](Mac) or [Alt](Win) key.
#
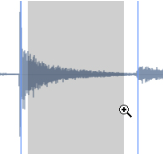
Using a Zoom rectangle
To select a certain area to zoom in on, proceed as follows:
1.
Hold down [Command](Mac) or [Ctrl](Win) and press and hold the mouse button in the waveform display.
2.
Drag to make up a selection rectangle.
The area inside the rectangle becomes gray.
Zooming in on a certain area.
3.
Release the mouse button.
The selected area will now fill the entire window.
#
Zooming vertically
To zoom in vertically, click on the “+” magnifying glass button in the lower right corner of the Waveform Display.
To zoom out vertically, click on the “-” magnifying glass button in the lower right corner of the Waveform Display.
#
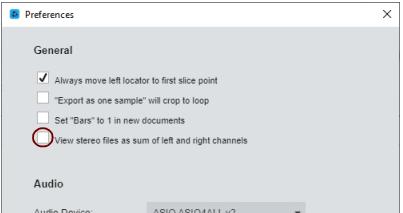
Waveform Display Options
You can customize the look of the Waveform window by using the settings in the upper half of the Preferences dialog:
#
The “View stereo files as sum of left and right channels” Option
To make the size of stereo files in the ReCycle window more compact, the left and right channels of stereo files can be summed to one channel, instead of being stacked on top of each other. Note that this is a display option only, the actual audio material is not affected in any way.
#
The View Menu
The View menu features the following items that relate to how the waveform is displayed:
#
Magnify to Fit /Magnify to fit Loop
If you select Magnify to Fit from the View menu, the display will zoom out so that the entire sample fits the window. If Magnify to Fit Loop is selected, the display will zoom in (or out) so that the area between the left and right locators will fit the window.
#
Jump to Cursor
If this is selected, the window will scroll to the current play position, maintaining the current magnification factor.
#
Scroll during Playback
When you play back, the current position is indicated by the Play Position Pointer traveling across the waveform display. If the option "Scroll during Playback" is checked on the View menu, the current position will always be displayed in the waveform display. This option can also be toggled on or off by pressing [F] on your computer keyboard. The Navigator frame indicates which area of the waveform is currently displayed in the Waveform Display.
The Navigator frame shows you which part of the waveform is displayed in the Waveform Display.
#
The Edit Menu
The Edit menu features the following items:
#
Undo/Redo
To undo the latest action, select “Undo” from the Edit menu or press [Command](Mac) or [Ctrl](Win)
-
[Z].
The action to be undone is indicated next to the Undo command on the Edit menu.
If you wish to “Undo the Undo”, this is possible after an Undo operation, where the “Redo” command becomes active.
These menu items also give you a clue about what will be undone and/or redone. For example: If it says “Undo Delete Slice(s)” the last thing you did was deleting a slice.
#
Copy Loop
Use “Copy Loop” to copy the entire loop (i.e. all waveform data between the left and right locators) to the clipboard.
#
Paste as New Document
If the clipboard contains data, this can be pasted into a new (automatically created) document window by using the “Paste as New Document” menu item.
#
Delete
“Delete” can be used to delete selected slice markers.
Select All and Invert Selection are explained in
“Selecting Slice Markers”
.
#
Context Menu Items
Right-clicking (Windows) or [Ctrl]-clicking (Mac OS) in different areas of the waveform display will bring up context-sensitive menus. The context menus will contain various items also found on the Edit and View menus, but there are some additional items that are only available via context menus.
#
Main Waveform Display
The Waveform Display
By right-clicking (Windows) or [Ctrl]-clicking (Mac OS) in the main area of the Waveform display brings up a context menu with the following items:
|
Menu Item
|
Description
Set Left Locator to This Slice
The Left Locator will be placed at the beginning of the slice you clicked on.
Set Right Locator to This Slice
The Right Locator will be placed at the end of the slice you clicked on.
Set Loop Around This Slice
The left and right locators will be placed at the start and end of the slice you clicked on, respectively.
Magnify to Fit
See “The View Menu” above.
Magnify to Fit Loop
See “The View Menu” above.
Magnify to Fit Slice
This zooms in so the slice at the Play Position Pointer fits the entire window.
#
Slice Handles
Right-clicking (Windows) or [Ctrl]-clicking (Mac OS) directly on a slice handle, brings up a context menu with the following items:
|
Menu Item
|
Description
Lock/Unlock Slice
Toggles the “Locked” status on or off for the slice handle you click on. See
“Using the Lock Tool”
.
Mute/Unmute
Toggles the mute/unmute status for the slice handle you click on. See
“Using the Mute tool”
.
Delete Slice
This will delete any selected slice(s). See
“Deleting Slices”
.
Set Left Locator to This Slice
This sets the left locator to the slice handle you click on.
Set Right Locator to This Slice
This sets the right locator to the slice handle you click on.