Reason 14 Installation Manual
DAW
|
Rack Plugin
|
Reason+ Rack Extensions
Installation
#
System Requirements
Below you will find the minimum system requirements for running Reason 14:
Note that these are the minimum requirements! You will benefit from a fast computer with lots of RAM, since this will allow you to use more devices and tracks in your songs.
#
macOS
•
Fast and stable Internet connection for installation and registration required!
•
Apple Silicon or Intel Mac with multi-core processor
•
4 GB RAM (8 GB or more recommended for large ReFills or Rack Extensions)
•
8 GB free system disk space required, plus 8 GB for optional content (and another 12 GB if you are using Reason+). Additionally, the program may use up to 20 GB scratch disk space
•
macOS 11 (Big Sur) or later (64-bit)
•
Monitor with at least 1280x768 resolution
•
CoreAudio compliant audio interface or built-in audio hardware
•
MIDI interface and a MIDI keyboard recommended
•
For using Reason as a Plugin, a DAW host with VST3/AUv2/AAX support is required
#
Windows
•
Fast, stable Internet connection for installation and registration required!
•
Intel or AMD multi-core processor - or a Windows on Arm computer with Prism emulation software
•
4 GB RAM (8 GB or more recommended for large ReFills or Rack Extensions)
•
8 GB free system disk space required, plus 8 GB for optional content (and another 12 GB if you are using Reason+). Additionally, the program may use up to 20 GB scratch disk space
•
Windows (10)/11 (64-bit)
•
Monitor with at least 1280x768 resolution
•
Audio Interface with ASIO driver
•
MIDI interface and a MIDI keyboard recommended
•
For using Reason as a Plugin, a DAW host with VST3/AAX support is required
#
Installing the Software
Installing Reason will also automatically install the Reason Companion application. The Reason Companion app is used for installing additional Rack Extensions, Reason+ Sound Packs, etc.
Both the standalone version of Reason and Reason Rack Plugin are installed in the same procedure. So, even if you are only planning to use the Reason Rack Plugin, follow the installation procedure(s) below:
#
Installing Reason
Download Reason at
https://www.reasonstudios.com/download-reason
.
#
macOS:
1.
Double click the Install Reason file.
2.
Follow the instructions on screen.
If you have ticked the check boxes to install Reason Rack Plugin VST3/AU/AAX, they will be automatically installed here:
The Reason Rack Plugin VST3 is automatically installed in
Macintosh HD/Library/Audio/Plug-Ins/VST3
The Reason Rack Plugin AUv2 is automatically installed in
Macintosh HD/Library/Audio/Plug-Ins/Components.
The Reason Rack Plugin AAX is automatically installed in
Macintosh HD/Library/Application Support/Avid/Audio/Plug-Ins
#
Windows:
1.
Move the downloaded zip file from Downloads to your Desktop.
2.
Right click the zip and select "Extract All" to extract all files to a new folder (on your Desktop).
3.
Double click the Install Reason.exe file in that folder to start the installation.
4.
Follow the instructions on screen.
Before executing the installation of the software components, you will be asked to select a language, an install location, and whether you wish to create a program shortcut/alias on your desktop.
If you have ticked the check boxes to install Reason Rack Plugin VST/AAX, they will be automatically installed here:
The Reason Rack Plugin VST3 is automatically installed in
C:\Program Files\Common Files\VST3.
The Reason Rack Plugin AAX is automatically installed in
C:\Program Files\Common Files\Avid\Audio\Plug-Ins\
#
Both platforms:
Reason comes with some additional content (Rack Extensions and ReFills) that you can download separately, either right after the Reason installation or at a later point. To download additional content, proceed as follows:
1.
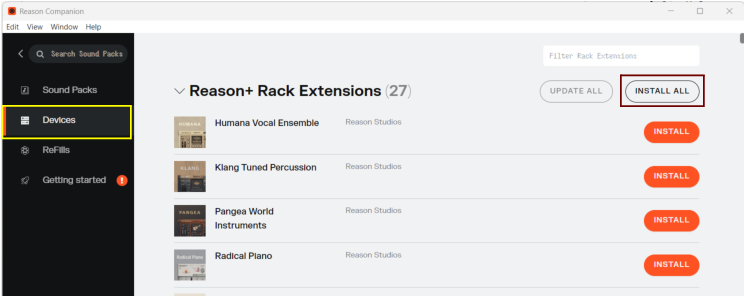
Open the Reason Companion app and click the Devices tab.
2.
At the top of the Devices tab, install the desired additional Rack Extension device(s).
Alternatively, click the “Install All” button to install all Rack Extensions in one go:
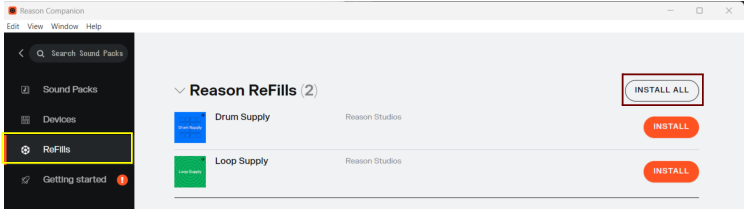
3.
Then, click the “ReFills” tab and install the desired additional ReFill(s).
Alternatively, click the “Install All” button to install all ReFills in one go:
4.
After installation, (re)start Reason for the installed items to become available.
The additional content is stored on your computer as follows:
•
The additional Rack Extension devices are stored in the following folders:
Windows: C:\Users\[your.user]\AppData\Roaming\Propellerhead Software\Optional REs
macOS: ~/Library/Application Support/Propellerhead Software/Optional REs
•
The additional ReFills are stored in the “Music > Reason Studios > ReFills” sub-folder.
#
Launching Reason
Double click the Reason icon to launch the program.
You can launch Reason from its Shortcut (if you chose to create a Shortcut during the installation procedure) or from the installation location.
On Mac, you will find Reason in the “Macintosh HD/Applications/Reason 14” folder.
On Windows computers you will find Reason in the “C:\Program Files\Propellerhead\Reason” 14 folder.
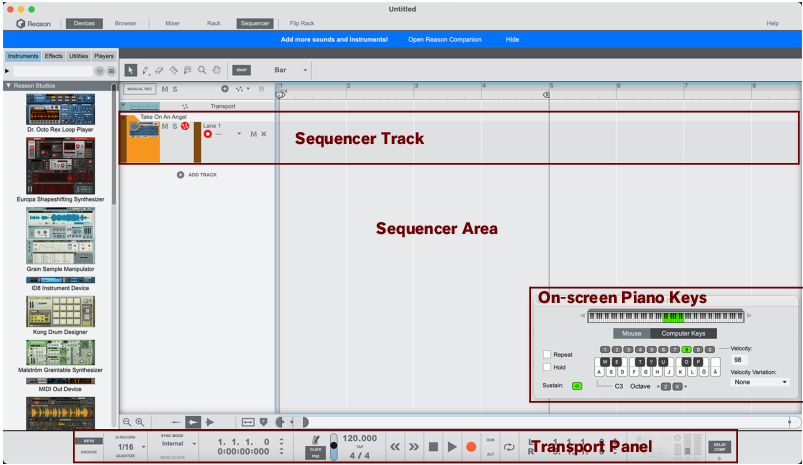
The first time you launch Reason the following song document will open:
•
The song contains a Polytone Dual-Layer Synthesizer sequencer track.
You can play the Polytone synthesizer using the On-screen Piano Keys window, which is open in the lower right corner. Just press the computer keys indicated in the On-screen Piano Keys window - or click the “keys” in the window.
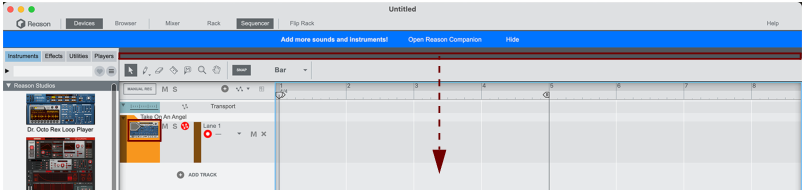
•
If you want to reveal the Rack to view the Polytone front panel, double click the Polytone image in the sequencer track list, or click the Rack button in the top bar:
The Rack will now open in a separate window.
For more details about using Reason, please refer to the Operation Manual.